Wednesday, 29 August 2012

Children's Art Aprons - for the 'Budding Artist'


Budding Artist's Aprons 
Bright colourful aprons for toddlers and young children - for budding future artists possible  Art on the Prom Artists ! 

Help the creative child express themselves with these funky little aprons - bright and colourful yet practical - helps protects clothes and lots little pockets for crayons, art materials or anything - children just so love little pockets to keep their little bits and pieces in! 
Each is reversible with one or both sides having as series of small pockets for those all important things! 
Each 'Budding Artists' apron comes with the pockets filled with crayons or felt tips ready for the budding artist to express themselves!
The gardening aprons have a packet of seeds in the front pocket

Past purchasers have told me that once their child/grandchild has it on they wont take it off! 

Of course the aprons can also be used for lots of other messy tasks such as helping Mummy cooking in the kitchen or helping in the garden! 
I wish I had thought of them when my children were young! 
Priced £10-12 each

PS Some of the aprons come with matching adult aprons - so Mother/Father  Daughter/Son
or matching aprons can be made on request 

Saturday, 25 August 2012

Frister & Rossmann E Series SPHINX CLEOPATRA - Vintage sewing machine: my new toy!!

Frister & Rossmann: E Series - Sphinx Sewing Machine 

After cleaning and full service - shining bright CLEAN!! 
and now working - was rather filthy and very jammy before ...
I just so thrilled with it ...like a kid with a new toy!!!
Think I will sew my Mt Fuji silk quilt with it - nice controlled sewing of lots little pieces fabric - LOL!!
Yet to find out what it likes and dislikes in fabrics - sewing machines can be very temperamental and I have found the older machines favour one type of sewing over another and many do not like their tension being constantly re-adjusted. So I tend to have machines dedicated to specific materials and weights i.e. one vintage machine for heavy duty sewing, another for fine silks  and a modern electronic machine for all the fancy stitches .............. getting to be a sewing machine junky! But I am beginning to have quite a love affair with the old vintage models - they are just so beautifully engineered.

Now where in a modern machine does it say (& I quote) "This machine with correct maintenance will last many decades" Take your breath away in this modern throw away society - these machines were made to LAST  !?! 
I rest my case for sewing with a vintage machine!!! 

The Sphinx on the sewing machine head - very female unlike the original!!

Cleopatra eating a Lotus on the flat bed  - you can see where Madonna had her idea for her 'Madonna Bra's.... Nothing is new! 

The Quiltman badge on the pillar - still very bright and shiny!

Now found out that this machine dates to the 1920's 
The 'E' Model was the most popular machine that Frister Rossmann manufactured - a German company 
It is adaptable in that it can fit into a treadle base - the holes, complete with metal lining, in the base are there ready to go - shame it wont fit into my old treadle as it is a smaller machine not the wider base. 

One of the main reasons I bought her is because she has an adjustable stitch length (via  screw knob) not just for forward stitching but for reverse as well! Whereas most vintage sewing machines I have seen only have an adjustable forward stitch but the reverse is just a standard length ............ a close up of this pic coming..........

She is now a little beauty and now sewing well after a massive clean and degunge - I took her to bits and cleaned n scraped all the dirt n rust off - had to use WD40 to ease rusted in screws (but quickly wiped off to prevent damage to the finish), so I could access its inner workings and even just to free the sewing machine foot. 
Then oiled and oiled some more - and scrubbed & scrubbed with toothbrush - lots & lots of paper towels .......cotton buds ....and hours afterwards this is the result a wonderful clean machine which now sews like a dream! Certainly worth a whole days work! 
The case is to be cleaned and re-waxed and should be pretty good as well - just wish had taken some before pics! 

Behind it you can see an old basic Czechoslovakian machine I tried to rescue - I gave up on it as just could not keep the tension - would snarl up everytime I changed fabric weight, and the bobbin constantly kept falling out - so all teh effort to clean n oil it was wasted. I managed to contact the Czech company but they have no record of it now and no spare parts and advised that I don't bother with it - shame 

I also have an old Lotus Singer 99K (12" base - great for quilts) in a treadle base - now this needs serious work as well to get it back into order and a new treadle belt and I don't know what else 
I have moved it out of the drawing room so I can work on it and clean it without the fear of oil and solvents dripping onto the carpet .... then I have to get into treadling mode...... trouble is I am not sure I will have the energy to do it due to the M.E. but maybe in very short sessions of a few minutes .... now that will take forever to sew anything! I will post pics of that - but with a before as well as after cleaning and servicing it. 

I cleaned it and stripped it down and sews fine now - used a motor and disconnected the treadle belt as I just do not have the energy to pedal these days :( 

Friday, 17 August 2012

ART on the PROM - SUNDAY 2nd SEPTEMBER

The next Art on the Prom
 in 
Felixstowe 
is on 
SUNDAY 
SEPTEMBER 2nd 
2012  
The Art on Prom Display in Pierrot's Window - who kindly support the event 

Detail of the display 


See the video advertising this years ART on the PROM
http://www.felixstowetv.co.uk/video-archive/viewvideo/919/community-a-charity/art-on-the-prom-promo

On the display board along with some lovely art work and photography are a couple of my items -
Hand Felted  and Crochet Floral Bag - with flowers and bead embellishment
(Part of a series of bags)
Hand dyed and crocheted  Shawl
Hand painted cushion cover 

I will be there......................so look out for me 
DH will be helping me and doing all the hard work setting up and taking down for me and helping through the day 
I will be sitting on my chair - lets hope good weather and lots people buying!! 

I will have among many things ..........
A wide range of my crochet - clothing and throws 
Hand painted and quilted beach hut - bags and cushion covers
My photographic cards 

Ask if you do not see anything you like as I will have extra things in crates under the table 

Remember you will be able to order things in alternate colours and yarn qualities - so just ask! 

Better get busy and make a few small things - do not have any lavender bags left for example! 

Thursday, 16 August 2012

Double sided damask throw

Upholstery weight reversible cotton damask

So what do you do when you have an odd piece of fabric and 4 cut trimming bits???
This is a cotton damask with a positive and negative side - and you cant decide which side to use - or how best to use it??
MMMMMMMmmmmmmmmmmm she thinks ? 
....................waiting for that brainwave .............. 
Aha ...........
A reversible cover with contrast binding - uses ALL the fabric bits = no wastage and reduces the stash and makes best use of the reversible nature of the damask  .............. and replaces my damaged  cotton knit throw (wine spillage) 
BUT used the binding strips to highlight the pattern by putting a positive side with the negative and vice versa  - so each side has the contrasting binding - neat eh?? 

So this is what I did .................... just in case you are interested ......LOL 

Reversible cotton damask throw - all done! 
Well I might add big cotton and beaded tassels on the corners .......

Well I took the four trim pieces, cut and then re-pieced them (placing fabric front to back), then folded them to make binding for the bigger piece. Sewed each piece on (double check you have enough length and put them on shortest side first - unlike me  that sewed wrong sides first! Meant a bit of bodging ....ehhh hmmm) Also make sure you place the wrong side against a right side - so trim will contrast when folded out 
I did plain strips without mitering as I did not have enough length of trim 
I fringed the ends so as to reduce the bulk at the corners 

Here it is thrown over  the corner of my sofa

So a new sofa and throw all made from scraps and remnants, plus roll ends all of new fabric - now you can't make a cover as economically as that - well unless you recycle used fabric (which I have done in the past) 
So for less  than a £100 I have recovered the cushions for the sofa and its matching chair, plus a matching throw!
Now just think how much I would have had to pay someone to make them .................. hundreds of pounds!!

Now I can use my full rolls for jobs that require much bigger single pieces of fabric e.g. curtains
But I am still thinking on doing a patchwork chair .where each section is a different piece of fabric - again all in cream damasks ...............mmmmmmm oh dear may have to use these covers to get the necessary variety of fabrics ................. but that can easily be done as the covers can be easily taken apart if I need the fabric 

Ahhh now to make a cup of coffee and admire my latest efforts ............. :-) 

Sofa's New Covers ........so easy its ridiculous!

Here is the sofa with new covers an all its cushions - various damask cottons in cream
The big pillow is in a gorgeous textured two tone cream and taupe fabric - the flowers and leaves are all puffy and raised by the weaving process - just stunning!


This was 'before' - but when I washed the covers they shrank even further so cushion covers were too small for the feather cushions - so they became like rocks to sit on - very uncomfy!!
Underneath the Sanderson covers was eh original gold brocade on the base of the sofa - just a couple of marks to try ad get off but otherwise in really good condition and much nicer than the over tight  'colourful covers' 

Chair after recovering cushions in cream cotton damasks - with a new honey chenille cushion on the arm

This the matching chair - with it's too tight covers 
The covers were a nightmare to try and get off and on as too tight - really hurting my hands and arms............

These covers are the easiest ones I have ever made! Perfect for me with my arthritic hands and lack of strength due to the M.E. - ie I can get them on and off with great ease as NO zippers or Velcro and so easy to get on and off for washing or just changing  colours! 

This project made great use of all my cream cotton fabric stash of remnants and ends of rolls .....each cushion took a piece - so each cushion different fabric (except two in damask so just reversed the fabric sofa +ve and a -ve) 
I have enough left on the roll of linen (which I did the summer curtains with) to make a loose slipcovers on the bases of the chairs/sofas - I think! Otherwise be made in sections of different fabrics again .. will see.
I just made simple bags - side seam and bottom seam - left the ends open - sewed a flange around (could have made them tighter and made sugar bag bottoms- which would have been even easier). SO openings are at the back or bottom of the cushions and excess fabric is just tucked in like a pillow slip) So ever so easy to make - and get on/off in case of spillage or change of colour scheme! 

So nice loose fitting (so when washed they wont be to small - but did prewash all the fabric) relaxed style for the summer .......... and my poor husband says sofa now so comfy and falls asleep! zzzzzzzzzzzzz 

Plus of course recycled several old pieces of furniture that would have been taken to the dump
They were worth doing as in good shape, sprung seats, horsehair stuffed arms and all the cushions are feather
I was thrilled when took off the slipcovers to discover the original gold brocade covers - which is just a gorgeous fabric - it must have been an expensive piece when first bought!
Now to do the rest ...................


Wednesday, 15 August 2012

Designs for the Larger Woman ............bamboo-cotton jacket

A re-work of my Ziggy-zaggy Missoni Style Jacket/Coat design for a larger size - and it worked beautifully!
Still flatters the figure - easy to wear 
Made in a  summery cream bamboo-cotton blend - so a gorgeous drape and swing! 


Ziggy-zaggy Missoni Style Jacket 
three quarter length with cape sleeves to the elbow 
Hand crocheted in cream bamboo-cotton blend which has a lovely drape and hang
This the version for a c40-45" bust 
Hangs well and fits and flares 

It has been picked up and fitted perfectly and looked super on! Well pleased :-) 


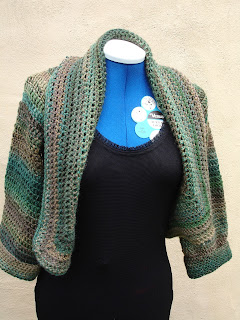
The Origami Jacket - with NO seams! New Design

Side and front views 
Shawl collar, which can meet at the front or fold back with full length sleeves 

Well a new design has flew off the hook ................... was paying with my yarn (as I do) a space dyed wool blend .........and started making a shrug .................. which got fiddled with (as I do) ................ then remodeled the outer border ............as one does and hey presto a new shrug/bolero! 

A neat tidy design - involves NO SEAMS! 

Back view - showing the square based back panel 


Thursday, 2 August 2012

Lilies - best I have grown !

This year have had the most magnificent Lilies - this is one pot! 
Was going to move them so I could see them from my kitchen window - but would end up covered in pollen 
Are they not just lovely???

Mt Fuji Quilt Block

Mt Fuji Applique and Embroidered 12" Cushion Cover 

Each panel has been machine embroidered with a combination of shaded quilting /embroidery threads, metallic threads and Madeira cotton .
Here the sun has really picked out the sparkly threads - enlivening what could be rather dark colour palette 


Used a striped silk and added rows of 'crops' in the 'furrows' in two different shaded cotton threads with a variety of stitches to indicate various crops at various stages of growth 


Gold thread for the snowy mountain top with blue Madeira thread stars and channel quilting for the sky. 


Mt Fuji Crazy Quilt Block 
Trial square - first applique 

I have been planning this for several years after doing my first landscape quilt based on the woodblock (see earlier blog) 
I liked the simple lines and thought ahh haaaaaaaaa a crazy quilt block in the making with some meaning and control of patterns 
So this first trial piece s done to be a small cushion cover and in drawing rooms winter colours of terracotta s and dark inky indigo blues 

Appliqued silk pieces on a cotton foundation piece
Then quilted and machine embroidered 
Linen indigo strips to frame it with a very dark inky indigo navy backing