Friday, 24 September 2010

Brunschwig and Fils 'Lichfield Hills' Wallhanging - finally completed

This is showing work in progress


The piece has been quilted by hand, embroidered and beaded.

As the fabric has 16 colours I have used a wide variety of beads and embroidery threads to reflect thecolours and wonderful quality of the fabric - it was a dream to work with (but then it was expensive fabric).
The embellishments were worked to bring the trees 'forward' so the houses were 'pushed' into the background
So the dominant trees were beaded and the trunks embroidered
Only the central part had been selectively quilted
It was all done by hand - apart from sewing on the border and backing

It took a couple of months of work to complete
and now has been backed and bordered in co-ordinating fabric

Now to decide where to hang it .................

Will add a pic of it completed


Has 16 colours in the print and is the pattern 'Lichfield Hills'

Thursday, 2 September 2010

Finishing touches ......bedroom

I posted pics of recent bedroom makeover - the curtains are still 'hanging in' until they can be properly hemmed but in meantime ............................
Antique Rose Throw

This is made from a 'space-dyed' mohair - so soft light fluffy and incredibly warm and snuggly - ideal for approaching cold winter nights n snuggling in with a book

Do not know quite how to describe the colours - its a dark dusky rose with an ochre which makes subtle stripes in the 12-point throw
The stripes seemed quite obvious as I was making it ...................  now seem to disappeared!
I shall try to photograph it again - maybe outside, to more clearly illustarte the subtle striping.


The colours are very difficult to pick up by camera .................. all I know is that I was using almost a whole ball of wool for each row towards the end. Its a bit logarithmic in quantity - the bigger the throw the more wool you use, without seeming to make the throw much bigger!

Anyway hope to make more in different colours for sale as they look quite unique and are just sooooooooooo luxurious and cosy!

Next week I had better get down to it and hem all the curtains and attach the fringe .................all of which needs to be doine by hand.

Tuesday, 31 August 2010

Garden cushions

Decided that I had had enough of  my rather tatty garden seat cushions that I found on Freecycle - so new makeover!

So 4 cushion covers - no tie-ons as planned as each set of chairs has a different back
Also made a bag for them all to go in
&
a matching cushion with a flanged edge ( to rest my weary head on when zzzzzzzzzzzz'ing int eh garden or reading a book)


This a pic of 'before' - pretty yucky

All these cushion covers were made from scraps brought from ebay - came as 5 pieces of offcuts - a printed linen check
I matched the checks on each set of cushions (because I am a perfectionist)
Had 3 strips left - which made the bag
3 oddments left which made the matching cushion
&
they ALL fit into the capacious bag - with nice cord to hang it up with when they are not in use
So easy storage

All that was left was a couple scraps and the trims from cutting the corners of the cushions

Now all we need is some sunshine so I can use them in the garden!
G&T anyone....................??

Sunday, 29 August 2010

.....more cushions - boring to snazzy!

Take one boring old gold cushion cover (seen behind fancy one) and a couple of fabric sample squares in organdie and hey presto an instant makeover
This one is red and gold one side and brown and gold the other - a summer and winter side
The gold co-ordinating with base colour of cushion - which will show through the organdie


and this is the other side

You just take one old boring cushion in need of an update
Measure it up - in this case 15"
Take two 16" fabric samples
Tip: Centre designs or place pattern in pleasing place
Trim up side edges - and sew a quarter inch in to prevent fraying
I had planned to fringe the side edges -ut being a double faced jaquard it would not fringe at all!
So a nice string edge
But with right fabric you can fringe the edge for a nice finish
Sew top and bottom (French seams to keep it neat and tidy - or zigzag edges or use a serger) to fit sungly around cushion
Then just slide on the slip-cover
Easy peasy!

Just slip off when season changes or you fancy a change - could not be easier!

You can use any fabric that co-ordinates with the base colour of interior cushion cover
Its quick and easy and cheap to do

Friday, 27 August 2010

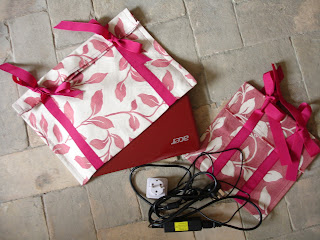
New project - Sleek sophisticated notebook/laptop and accessory cases


One laptop case with co-ordinating bag for power cables
These are made in a double faced damask (upholstery fabric so last for ages) - so have made them so one side is the 'positive' side the other showing the 'negative side.
They are totally reversible with a self fringe - no raw edges as the seams use a french seam
The slipcases are of generous size - so you can tuck in your notes and a pen or two and the tops simply fold over - no studs, buttons or buckles to damage the sensitive screens

You can easily slip out the laptop when you have to put them through the X-ray machines at security gates


Here you can see all the accessories tucked into the bag with plenty of room


Here is the matching set - with ribbon closures
These bags have the same side of the fabric showing on both sides but are tied closed with plain grosgrain ribbons

Both are of the same size - the bigger envelope bags can hold a notebook or an A4 folder or notebook - teh smaller bags can either hold the power cables and mouse or make-up or whatever

Plan to write up a tutorial on how to make them and sell the patterns and finished bags (for those who can not sew)
They will be made in both feminine and masculine colours and fabrics and designed to act as slipcovers for notbooks for travelling and/or to act as dust covers to protect the notbooks/laptops
The accessry bags are seperate so that when you travel the power cables etc do not put any pressure on the sensitive display screens - hence the cases have no embellishments to cause any pressure on the notebook case/screen


Here isa  close up of the ribbon closure bag with notebook inside - the ribbon closure allows for plenty of adjustment in case you need to add in files or use it for another purpose e.g. A4 notebook. papers, magazine, folder, clothes for travel etc


Here I have added a magazine for scale - so you can see the larger of the bags will hold a standard magazine with ease.

More catch up projects ............ Pretty Flamingo

This wall hanging I quilted many years ago - but have now beaded the flamingo in the middle and finally finished it off!!


Just to add focus to the wall hanging I beaded the central motif which is the flamingo
His head and legs are encrusted with beads but his wings just ahve the central rib beaded
I used a mixture of matt and pearlescent beads


Here is a  detail of his head - two tones of pale turquoise, lilac and dark blue beads with black, red,  and mutlicoloured beads

and of his wings
I tried to select from the multicoloured beads - the co-ordinating colours for each feather to contrast with the matt lilac beads on the rest of the feathers

The quilted piece now has a border and hanging slot at the top - now to find right place for it in the house and it will need a spotlight at night - so it will have a subtle sparkle to brighten dark winter nights

Wednesday, 25 August 2010

Transformed Drawing Room ................ creams and browns

Also been chased up for pics of this project as well .............. a quick change for Summer look in Drawing Room - all cream for cool summer colours. In the winter its all rusts and browns as its a north room (so a cold north light)
So the rust and brown rug has been rolled up to reveal the cream fitted carpet

Curtains in a cream linen damask with two colours of ribbon (brown and coffee coloured) trim along the headers
The other window has been done in the same style as well
I added these to stop the curtains looking bland - those stripes really make the curtains look sharp and tailored as the linen hangs in crisp linen folds


Now leather cushions transformed with new slipcovers in a printed silk - made with scraps I bought off ebay!


Here is close up of -
one of slipcovers - edges bound with the same ribbon as one the curtains
one small cushion made from a scrap
and
one larger cushion made by cutting two left over pieces of fabric and alternating the strips to make a striped cushion
All I had left were a few tiny scraps of fabric
Case of waste not want not! LOL